 Sigmoid Function [1]
Important: Please read the entire user manual to fully comprehend Neural Networks and how Neural Mesh can help. Skimming over will do no good.
Neural Networks are a relatively new technology that aims to reverse engineer the functionality of the brain within a mathematics model. This may sound daunting and complex but the underlying concepts are very simple and Neural Mesh does the hard work for you.
Because neural networks utilize fuzzy logic, the standard system architecture is slightly different. With programs and systems we create, we are used to entering some input data, processing that data with conditions and logic and then outputting some data. Neural networks work much similar except the processing is done behind curtains. We don't really care how it gets to an output; we just want to make sure it does.
The magic behind neural networks is its ability to learn. Because the 2nd tier of the system (the processing layer) is out of our control (essentially) we have to return correct results somehow. This is done by training the network. The network has to learn from past experience to be able to produce credible results.
The main types of training are supervised and unsupervised training. Supervised training is when we know exactly what we want to output from certain inputs and perform the training iterations ourselves, manually. Unsupervised training is when we automate a training set based on past experience; for example if the network was to learn how to play chess and it is beaten, we want the network to learn from its mistake and train it with the preferred response (or output).
Sigmoid Function [1]
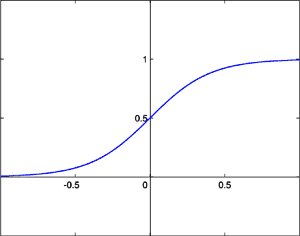
Neural networks take in binary digits and output 'fits' (fuzzy bits). Fits will always be between 0 and 1 but never absolute (e.g. 0.43436, 0.9, 0.1). For this reason, to make use of the output, we have to round off the fits to form bits (binary units). A reasonable threshold would be: anything greater than 0.8 should be 1 and anything lower than 0.2 should be 0 (anything in the middle means the network is not smart enough and requires more training). Looking at Figure 1 we see the graphical representation of the sigmoid function (the function used to return a fit). You will notice that 0 or 1 is never reached in the line hence why we must do logical rounding.
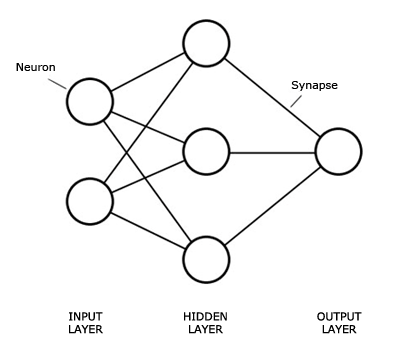 Graphical representation of the structure of a Neural Network
A neuron is basically a black box with inputs from synapses and an output passed to succeeding synapses.
A synapse is the connections between neurons. They have a weight value which is used to determine the off or on state of a neuron.
The first layer of the network is the input layer. This is where data gets entered for which we want results. The amount of neurons in this layer will depend on the data we are entering and how large the bit string will be. This layer is abstract and acts as a virtual layer to pass on data to succeeding layers.
The information from the input layer is spread through to the hidden layer and using weights and mathematical functions it decides a path and outputs a value for each neuron to the next layer (usually the output layer). Multiple hidden layers are possible but you will rarely need more than one.
The output layer, similar to the input layer, requires an amount of neurons relative to the type of data you want returned.
Designing the neural network is one of the most important aspects to utilising this great technology. An important thing to ensure is that you have a way to convert your input data to binary and then the resulting output binary to your needed format.
A popular example to use for explaining neural networks is the XOR logic gate. This will return 1 when there is an odd amount of 1's in the input. Here is a truth table for a 2 input XOR logic gate:
| Input | Output | |
|---|---|---|
| 00 | => | 0 |
| 01 | => | 1 |
| 10 | => | 1 |
| 11 | => | 0 |
So if we wanted a neural network to be able to perform the XOR logic gate we would need 2 neurons for the input layer, maybe around 3 for the hidden layer (there is no clear cut way of determining a neuron count for the hidden layer so play around and see which renders the best results, see below for more details) and 1 for the output layer.
For the AI in a Connect 4 game, we can user a Neural Network to decide based on the status of the board, which column to put a token down. The rules of Connect 4 are simple. Players take turns in placing tokens down a column of a grid and try to form a line of their tokens either diagonally, horizontally or vertically. The first player to connect four tokens wins.
First we need a system of recognising tokens. We will need to display an empty slot, a slot filled by player one and a slot filled by player two. This means we need two bits. 00 will indicate an empty slot, 01 will indicate a slot filled by player one and 10 will indicate a slot filled by player two.
A Connect 4 board is 7 columns wide and 6 rows deep. So therefore we will need neurons (or 84) to represent the status of the board. We only need 7 output neurons to represent which column to put the token down and we will choose the output neuron closest to 1. For now we will have 40 hidden layer neurons because we want some reasonable speeds but can increase if it is not learning.
The rest of the application can be done in another environment, for my example I used Adobe Flash. I also logged the moves that the player and computer took and what the status of the board was at that time and depending on who won the game, train the network with the winner's moves. So the more you play it, the smarter it gets.
As mentioned above, deciding on an amount of hidden neurons is not deterministic. There are some rules of thumb and heuristics to make the first decision easier, such as having 2/3 the amount of hidden neurons than inputs. Remember, the more hidden neurons, the longer it takes to process and train so it is a very bad idea to choose a large amount for the sake of it.
Our XOR network is well designed so now we want the network to actually produce correct results. Therefore, we need to train it. A training set needs to be made using the data from the truth table. Training works by taking a pattern or input and then specifying a desired output (or the output we want the network to return given said pattern). An algorithm will then work out which synapses need modifying to be able to produce this output, then modify it by the learning rate. This needs to be done many times to enforce these rules upon the network.
Hopefully the basics of neural networks are making sense but how does this technology help us? We can use neural networks in many ways such as character recognition, game artificial intelligence and stock prediction. They are useful when the complexity of the data and design is too impractical to implement by hand, when we want decisions to be based on experience or when we want the program to learn from mistakes through trial and error.
So that is the basics of neural networks and how they work, below will discuss how to use Neural Mesh to make neural networks a breeze to implement.
Installing Neural Mesh is just 3 steps and as simple as copying and pasting a folder and running an SQL dump file. The following steps should successfully install it.
After an install, the default username will be 'admin' with the password 'admin'. It is highly recommended to add a new account and delete this default one (there is no functionality to edit as this is trivial and just as easy to create a new account).
The control panel is the first page you will see after logging in. From here you can select a network to work with, add a new one and see some quick statistics.
Most of the form items when creating a network are fairly self explanatory. Choose a name specific to its function; decide the amount of neurons, in each layer and the amount of layers.
It gets a bit tricky when we reach the training settings.
The learning rate defines how quick the network learns. There is a trade-off between speed and accuracy when deciding this value. If it is too large the network will oscillate back and forth, not properly reaching a precise level. If it is too small the network will take a lot more time to train. A good medium is 1.
Target MSE (Mean Squared Error) is a target that we want out network to reach. The MSE is basically an indication of how inaccurate the network is or its error. The lower this number, the more intelligent it will be. If this value is reached during supervised training, the training will stop. Do not make this number too small as we can deal with an error of around 0.02 by rounding the values.
The epoch max number is just a maximum amount of supervised training iterations or you can think of it as a time out. If training has gone on for this many iterations and the target MSE is yet to be reached, then stop.
Now it gets even more advanced. Most of these values you will want to leave as default.
The initial bias value should usually always be one.
The momentum rate is when the net reaches a plateau in its learning; the momentum will continue to carry it in the right direction, overcoming the plateau. This value is kept normally between .1 and .75.
The initial weight range for random weights before the network is trained. If 5 then it will be randomly generated between -5 and 5.
You can see a tree styled outline of the network object by clicking the 'Structure' tab. This should be very helpful when debugging inconsistencies or bad network design.
From here you are also able to manipulate the structure such as adding or removing inputs, outputs, layers and neurons. This is very useful when finding an optimal design. A growing network can mean that more neurons in the hidden layer are required.
Looking at the structure outline you will see that the input layer isn't a part of the network object but more of an abstract level. Each neuron will have a synapse to each neuron in the layer previous so the input layer can purely exist in the first hidden layers synapses.
You will notice the label 'Authkey' with a string of digits and letters below it; this is the authorisation key to access the network using the API via HTTP requests.
The patterns that the network learns can be grouped into training sets that can be individually trained. You can manage training sets and patterns by clicking the 'Train' tab. This method of training is called 'supervised' training because we know exactly what goes in and what we want to come out.
A pattern is basically some inputs and its desired output. In the XOR example, one of the patterns was 01 => 1 meaning, if 0 and 1 is entered in the network, we want it to return 1. We create patterns to teach the network. New patterns can be created based on past experience; this is called 'unsupervised' training.
Once you have filled up a training set with some patterns, you want to teach the network this newly made training set. This can be done by clicking the  icon. This will most likely be fairly slow as thousands of iterations and calculations are taking place to optimize the network for your training set so be patient!
You should have been directed to the history page once the target MSE was reached or the iterations max was reached (whichever was first). Here you can see when you ran a training set, the error before training and after (i.e. how much it learnt from the last set) as well as the amount of iterations it took. This is very useful during training as we can see how much the error is changing by, how many iterations it needed in case we need to up the learning rate, if we need to run more iterations or if we need to lower the target MSE.
Once our network has undergone its rigorous training sets we can give it a whirl. Clicking on the 'Run' tab will display an input box where we enter some binary inputs.
If the output is round about what you expected (a good indication of accuracy is if it returns > 0.8 for 1 and < 0.2 for 0) no further training is needed. If the outputs are around 0.6 it means our network is not properly trained (viewing the training history can help determining why). We can solve this by lowering the value of the target MSE or allowing more epochs (if it is exiting because of reaching the epoch max). Another problem could be an insufficient amount of neurons in the hidden layer but this should be tested last as the design needs to be solid to begin with.
If you want to implement Neural Mesh with PHP, simply include the 'nm-controller.php' file and create an instance of the 'NeuralMesh' class with the authkey to determine which network. There are two types of networks: Managed and Unmanaged.
Managed networks will appear in the manager and will utilise caching and log training history. In essence, it is a network you want control over.
Unmanaged networks are temporary and can be deleted through the controller and will not show in the manager. These networks are more on-the-fly and are good for recommendation engines or user specific networks.
define("AUTH_KEY","08b5c0f308f7ba12afcc9e9e0682426b");
require("neuralmesh/nm-controller.php");
$nn = NeuralMesh::getNetwork(AUTH_KEY);
This is the Neural Mesh controller and will allow you to run or train the network within your pre-existing code.
With a 'NeuralMesh' object initialized, we can run it by simply calling the 'run' function with the input as an argument.
$outputs = $nn->run("00");
The outputs variable will now hold an array of the outputs returned.
To create an unmanaged network using the controller (or API) use the following code:
require("neuralmesh/nm-controller.php");
$nn = NeuralMesh::createNetwork(2,1,3,1);
The arguments in the 'createNetwork' function are the number of inputs, outputs, hidden neurons and hidden layers respectively.
The NeuralMesh object will now contain a variable called authkey. You will need to keep a reference to this anytime you need to retrieve the unmanaged network (in a cookie for example).
setcookie("mynetwork",$nn->authkey);
The other function the Controller provides is the ability to run a quick training iteration.
$nn->train("11","1",100);
The first argument is the pattern, the second is the desired output and the third is the number of epochs to train for (the default is 30). This function will not return anything.
If you need to use Neural Mesh in another environment, the same functionality is possible via API calls. See below for more details.
Neural Mesh has a slightly different approach to user management. Accounts stem from a network. An account which creates a network has full rights over the control of that network. They are also able to create new accounts which will have the same amount of access to the network. Therefore, users do not get assigned to different networks but new accounts added. So once an account is created, that user is able to see the network as well as create their own.
To create a new account for a network, go to the 'Users' tab in the navigation and then the sub tab labelled 'add'. Then just enter the username and password and those details will provide access to the network.
The history page has been mentioned before and can be very useful in understanding how the network is evolving (or learning). There are two history pages, the main one which can be found in the top level of navigation, and the training set history pages. The main will show every logged training set with an extra column to indicate whether the set was supervised or unsupervised. The other columns are: iterations (a count of how many times the set was taught), start MSE (the mean squared error before the training set was initiated), end MSE (what the error was after the set was taught), date (when the training took place), exec time (or execution time; how long the set took to train).
The training set history pages is just like the main history page but only shows history of the set you are currently viewing. This can be found via Train -> History.
Make use of the history pages as it can give some great insight into how well your network is configured. For instance; lots of epochs, no real difference in the MSE and long execution time can mean there are too many neurons to process. The same with short execution time can mean the learning rate is not high enough or there are not enough neurons to replicate the patterns.
You can define some settings in nm-settings.php to control Neural Mesh. The mandatory fields are the database details but everything else can be left default if you so choose.
CACHE_LIFE - This is the cache that stores the outputs of the last time the network was run (including after training). It also caches the Tree View HTML.
UNMANAGED_LIFE - This is the lifespan of unmanaged networks (networks that are created without the intention of being permanent).
META_CACHE_LIFE - This is the template caching and the caching of exporting sets.
ROUND_DECIMAL_PLACE - This value determines which decimal place to round to in the API.
There is a cron PHP script in nm-cron.php to empty the cache and unmanaged networks. Simply calling this will determine whether cached data should be removed.
From the API we can run and train the network in any application via simple HTTP POST requests (which every language should be capable of) and using XML as the data format. There are five types of functionality we can utilise via the API: create, run, train, bulk and destroy.
Create will create an unmanaged network and return the authkey.
Run simply takes a string of inputs and returns some outputs.
Train will take a string of inputs (or pattern) and its desired outputs.
Bulk will do the same as train but can take more patterns (rather than do multiple train requests).
Destory will remove a network.
For added security, you must use an authorisation key specific to a user associated with a network. This can be found in the Structure page in the admin. To determine which function, use the listed types as the query string (e.g. nm-api.php?run). The XML request should be posted with name 'request'.
This is the basic format for sending a request to the API. Just add the authkey and the string of inputs to run.
<request>
	<auth>Authorisation Key</auth>
	<inputs>Input String</inputs>
</request>
A quick train is just as simple as the last example, except add a desired string of outputs.
<request>
	<auth>Authorisation Key</auth>
	<pattern>Input String</pattern>
	<output>Desired Output</output>
</request>
With bulk training, group the sets in a 'set' tag.
<request>
	<auth>Authorisation Key</auth>
	<sets>
		<set>
			<pattern>Input String 1</pattern>
			<output>Desire Output 1</output>
		</set>
		<set>
			<pattern>Input String 2</pattern>
			<output>Desire Output 2</output>
		</set>
	</sets>
</request>
It is only possible to create an unmanaged network via the API with the default settings (default learning rate, momentum rate etc etc). You will need to use your user's authkey (found in the control panel).
<request>
	<auth>User Authkey</auth>
	<inputs>2</inputs>
	<outputs>1</outputs>
	<hidden>5</hidden>
	<layers>1</layers>
</request>
Removing an unmanaged network is simple. Use "destroy" as the query string and simply pass a request with the authkey in it.
<request>
	<auth>Authorisation Key</auth>
</request>
Only running the network and creating a network will respond with data. The data sent back will be XML in the following format for running.
<response>
	<outputs>
		<output>Output 1</output>
		<output>Output 2</output>
	</outputs>
</response>
The outputs will be fuzzy bits (i.e. not rounded) and will be as many as there are output neurons.
For creating a network, the authkey will be the only response.
<response>
	<authkey></authkey>
</response>